Different Types of Microscopes and their parts and function

If you are thinking of acquiring one and you are lost, without knowing where to start, then you are in the right place. Through this detailed guide, we will show you everything you need to know and look at when looking for one.
This post includes:
- Introduction
- Working principle
- Types
- Parts
Who invented the microscope?
The invention of the microscope was a great advance for microbiology, being invented by Zacharias Jassen in 1590, with the help of his father who was a manufacturer of glasses. He began by conducting experiments in the workshop by placing two lenses at both ends of a tube, with which he noticed that he could visualize with the objects considerably magnified in relation to what he could with only one so that microscopes still have in general terms the structure of the first created.
How does a microscope work?
Microscope technology has evolved a lot compared to its creation, so depending on the type you use it may work in different ways, however, we will show you how they work in general terms: working with two lenses that increase the size of objects and allows it to be visible to the human eye, projecting the image directly on the retina, working by refraction similar to telescopes.
Its operation is based on the collection of light from a small area of a fine sample, which illuminates the study specimen, having a short focal length and a spherical objective, which in its second lens magnifies so that you can see in detail. Likewise, its focal point may vary if it is optical or electronic because the latter works with a camera or scanner for higher quality pigments, and in some cases, they use a monitor to transfer or display the image.

Parts of microscope
It is important to know the parts of the microscope since it is the first thing that will help us to know how to use it and how it works in its entirety.
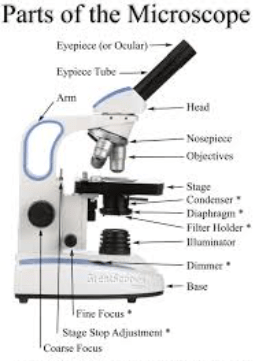
1. Base or foot
This is what provides stability and provides balance, with adequate weight, in addition to housing the light source and serves as a support for the column or arm, they are usually Y or rectangular.
2. Stage
It is the horizontal support in which the object to be observed is placed, it has in the center a circular hole through which the ray of light passes, it is usually square in shape and allows you to view the object in a concrete way because it is stable and you can move it to visualize what you need.
3. Arm
It is a C-shaped piece that is attached to the base with a hinge that allows it to be tilted as needed, which in turn this adjustment allows the increase or decrease of light capture, also supports the tube at the top.
4. Tweezers
There are two of them and they are located on the stage with the function it fulfills is to hold the object to be observed from two sides, giving it the comfort and stability to observe precisely.
5. Micrometer screw
It provides an almost imperceptible fine adjustment that generates the sliding of the tube or the stage to achieve more clarity of observation, which also has a drum to measure the thickness.
6. Coarse screw
With the movement of this screw, the microscope tube can be raised and lowered, sliding vertically. These screw movements are long compared to the micrometer, which allows a quick adjustment of the observation.
7. Revolver
It is attached to the tube and allows the exchange of objectives only by rotating it, being a semi-sphere that has a series of rings where the objectives are going to be screwed, when rotating the objectives they are observed through the tube and this works to change the focus of view.
8. Tube
It is the one that supports the optical part of the device, being a hollow cylinder that has a diaphragm that prevents reflections and is black on the inside. In it you can carry out all the observation and it is that the other components are functional for this.
Parts of an optical microscope
In this case, we show you the parts that play a fundamental role for observation through the microscope and are the optical parts.
1. Spotlight
It is the one that generates the beam of light that illuminates the sample, being first directed to a mirror that then reflects it to the object, its position will change according to the type of transmitted or reflected illumination it offers.
2. Condenser
It is the piece in charge of concentrating all the light rays coming from the focus, containing them in different lenses, to transmit the light in a parallel or convergent way, which causes it to be projected on the sample,
3. Diaphragm
It is in charge of regulating the amount of light incident to the sample, which makes the observation contrast of the object studied vary, which varies depending on the type of sample. It is usually under the platen.
4. Objective
The objectives are a set of lenses that are close to the sample, having a short viewing distance, producing the first magnification stage, being mounted on the revolver allowing the choice of the required magnification.
5. Eyepiece
This part of the mechanism provides the second stage of magnification of the image that has been magnified by the objective, being through this that the user can observe the sample.
6. Optical prism
It is the one that is in charge of correcting the direction of the light, being essential in binocular microscopes where the prism divides the beam of light that comes from the objective so that it is directed to the two eyepieces.
List of Types of Microscopes
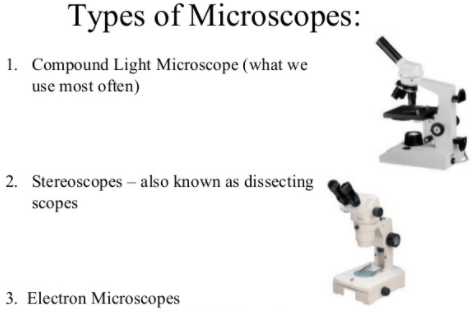
- Digital microscopes: It is one of the most used and it works with a computer since it has a camera that captures the sample and transmits it to the monitor. Volumes are mostly studied.
- Virtual microscopes: It is an initiative that seeks to allow people who need to access the results of organic and inorganic samples and works with the digitization of samples.
- Optical microscopes: This type is suitable for viewing very small things such as bacteria or microorganisms since it has a high magnification lens, in addition to being the conventional one and it is easy to use.
- Compound microscopes: It has an independent optical mechanism that provides better quality of observation through different crystals, it is the most used.
- Stereoscopic microscopes: It achieves lower magnifications, which makes it ideal for studying insects and plants, in addition to the fact that it is not necessary to prepare the material to be analyzed.
- Petrographic microscopes: It has the specialty of observation with low light and brightness, which makes it ideal for the study of rocks and minerals, where its reflection is reduced, allowing the study to be complete.
- Confocal microscopes: Increase optical resolution and contrast, which eliminates excess or out-of-focus light that is reflected off the samples, giving a limited depth of field.
- Fluorescence Microscopes: This type features phosphorescent and fluorescent light waves to give you more quality of detail on organic and inorganic components.
- Electron microscopes: The most characteristic of this type is that it does not use visible light but electrons as a source of illumination, which allows microorganisms to be widely studied.
- Transmission electron microscopes: It is characterized because its beam of electrons that produce light, passes through the samples, which allows a two-dimensional visualization.
- Scanning electron microscopes: In this case, this type passes its beam of electrons over the sample which produces a bounce and gives a three-dimensional image.
- Scanning probe microscopes: It is characterized because it works like a scanner, with the samples to give an exact image, including the volume. Giving thermal results.
- Tunnel effect microscopes: Its electrons work like a tunnel, which makes it ideal for studying atomic levels, its observation depends a lot on the environment where the study is taken.
- Ion field microscopes: It is special for atomic-level observation, as well as rearrangement through a magnified image.
Related topics: